Showing posts with label home decor. Show all posts

Tuesday, April 15, 2014

DIY Constellation Light


I originally got the inspiration for this project from Refunk My Junk. I started off following her tutorial but then things changed a bit. I will talk about that as we go. 

Ok, so here are the materials you need:

  • Large Canvas
  • Spray Paint - the original creator used Midnight Blue but I could not find it so I just a flat Black
  • White Chalk Pen/Marker
  • Some sort of LED strip lighting. I used this one from Ikea.
**You will not need the lights shown in the first picture for my version of the project


So first, I just spray painted the canvas. As you can see it was not even. I am terrible at spray painting but I think it actually worked out because the night sky has dimension to it.


Then I started to draw my constellations with a pencil. I looked at a picture of the summer constellations and kind of just drew what I wanted to. I am not an artist in anyway so this task made me kind of nervous - hand drawing something? Oh dear.... 

It actually turned out really well though. I mean - come on Lauren, how hard is it to draw dots and lines? Anyway. I did keep it simple though and only drew the more simpler constellations. Brandyn asked me why I didn't draw Aquarius (we are both Aquarius) and I responded with, "Well, as an Aquarius, we are very complex creatures.....and the constellation was too" ... Seriously. Aquarius was crazy. 


Then I went over the drawings with the Chalk Marker. 


Then I wanted to represent distant stars. In the original tutorial, she said she "splat" the chalk marker. I could not figure out how to do this for the life of me so I just decided to put random dots. I was very nervous to do this part because I didn't want it to look intentional but I didn't want it to look ... well ... stupid! So I just decided to do it and I randomly just threw the chalk pen down all over board (I didn't literally throw it, that wouldn't work.). It actually turned out pretty good.... See this project has a common theme - me being surprised at my ability. 


 Then I took a craft knife and poked holes where all the dots were. 


Here is where the project changed. As you can see, I am poking the garden lights through. In the original project, the garden lights stick through the canvas and light up that way. When I did that, I didn't like it. The lights fell out and it was really bulky on the other side. It just frustrated me so I decided to do without them. 
 

I leaned it up against the window because I thought - hey with the holes, the light will shine through. That stayed there for a bit but I needed to figure out a new solution to the project because it didn't really look nice to have a big canvas blocking the window.... That is when I went and bought the led lighting strips from Ikea.


Once I put it together, I stuck the strips on the back of the canvas like shown in the picture


Then I bundled up all the wiring (bane of this project's existence) and taped it down. The tape did not hold it. This was only temporary until I stuck it on the wall using command strips (which would hold it in there)


And here it is - all hung up and pretty! I must say, I do like this version better and am pretty proud of myself for it. I am not an artistic, crafty person so this was a huge accomplishment for me. We are going to put a few things up beside it - it won't stay solo up in that spot forever.


Friday, February 07, 2014

The Book Mailbox Part 2

A week or so ago, I showed "the book mailbox" here.

I had put it up with command strips and was a little concerned it wouldn't hold. It seemed to be ok at first. Oddly enough, it held for about 5 days and then I woke up in the morning and it was on the floor. What was really weird was that it is a big metal thing with heavy books and it didn't even wake us up when it fell...

So instead of putting it back up, I rested it on the ledge that sticks out in our wall. I actually grew to like it there so I went and got a picture frame to complete the look so it didn't look so by itself. This is how it turned out.


I actually think I like the way this looks a lot better so it worked out :) 

Wednesday, January 29, 2014

Dressing Table

Ahh a dressing table... something I always wanted but never had room for. When I was a teenager I would get ready at my desk and now there is burn marks in the wood from the straightener. My Mother was not happy....

I always liked to sit down when I got ready .. mainly because it takes forever to do my hair so I would get tired of standing. 

When we moved to this apartment, I knew I was going to be able to put one in... I also knew that I had to get something because not only is there no counter space in my bathroom, there aren't any electrical outlets! Now 4 months after we have lived here I can finally post a picture of my dressing table!


This was when I first got it so I thought I would show you it in it's barest state. The dressing table is the Malm one from Ikea. The mirror is also from Ikea... and so is the uniform I'm wearing ;) 


I then got some con-tact paper and lined the drawer with it. This stuff is the most annoying thing to put down. Oh and I also forgot to mention... the mirror is hung by command strips because that wall is a dividing wall so it is concrete. We weren't able to put screws in it. Anyway, I will note the mirror is still there and hasn't fallen down!


Here it is with everything on it. The drawers beside are another Ikea product. I use them to store all my other beauty stuff besides makeup. This keeps all my stuff out of the bathroom. In fact, the only things in my bathroom are my facial care stuff and my toothbrush! The chair is a temporary staple until I can get a nice fancy one.
 

Moving onto the drawers, I won't show what is inside because I don't have drawer dividers for all of them. I will also share more detail into how I organized my dressing table on my business website. I use the first drawer for jewelry, the second for hair accessories and brushes, the third has hair products in there, the fourth has anything to do with skin care: moisturizers, body scrubs, etc. It basically has any excess that I am not using at the moment. And lastly, the fifth drawer has all my hair tools in there. The little white drawers on top hold my nail polishes. Eventually I am going to put little stickers on the top of the lids so I can easily see what color it is.


I got the mirror from homesense and I spray painted a regular cup to hold some of my lip products.


I will be doing a tutorial on the spray painting makeup holders next week. This is the other side of my dressing table. The frame is from Ikea and I made the print myself using photoshop. Pinterest is great for getting free fonts.


And of course I have to include Lady! If you don't know yet, I love Disney so you will see little Disney things pop up around my house. :)

So that is my dressing table so far. It is not complete yet but I figured it was time to show you. I still need to get all the drawer dividers for the rest of the drawers and I need to finish lining the drawers. I also need to buy a nice chair but that is not an immediate to do for that. Getting the drawers properly organized is higher on my list!

Tuesday, January 21, 2014

The Book Mailbox

I have been growing quite the collection of books I want to read or am reading... problem is they all sit in a very large pile on top of my bedside table. 

I was just sitting on my bed once staring at the wall and an idea hit me. I went into homesense to search for the perfect product to execute this idea and I came across a tin industrial "book mailbox." That is what we shall call it - because it is kind of like an inbox but for books!

Here it is all set up with some books in it!


Our apartment is very old and our walls are plaster and the exterior walls (and walls between units) are cement so screws don't jive that well here. Because of that, I use command strips to hang most things. They are seriously amazing! You can kind of see it poking out at the top there but oh well. I was a bit worried they wouldn't be able to hold the weight of the book mailbox (which is pretty heavy itself .. it is metal) let alone the massive books that I have stuck in there but it is still up there!

As you can see there are a few books on my nightstand, that is my Q&A journal and my planner. I write in those every night so I will keep them there. Underneath is some magazines that I really have to get around reading.... 

Overall I love how it turned out! It is a great place to keep these books and once I am done with them they will go onto the bookshelf in my office of course!

Tuesday, November 19, 2013

Christmas Decorating

I like to respect Remembrance Day but the day after, it is totally fair game. On Tuesday, November 12th. We decorated for the holidays!


Yes there is presents under our tree. There are even more now. While we were doing this, we set the camera up and actually made a video (don't worry I sped up the time). So if you would like to see how Christmas decorating goes in our household, you can just press play! Psst.... There is a lot of shenanigans to do with the cats. They pretty much made the entire video.


And here are the pictures you see me taking in the video. Gizmo is hilarious... but I'm not bias or anything. 


Oh Gizmo...

Friday, November 08, 2013

1 Month In: The Living Room

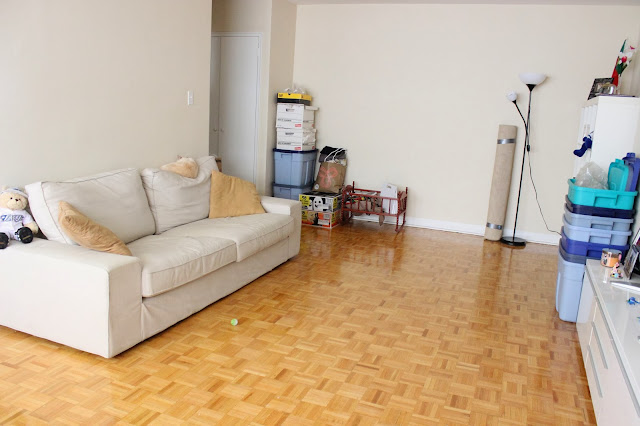
So last but not least: the living room. Here is the before:


The day these pictures were taken I was there to have the cable and internet installed. I was also really sick so that is why there is a blanket and Gatorade on the floor lol. Anyway. Here is the place now:

The view from the hallway. The bookcase is not even near done. I haven't organized it or anything really. I have just thrown stuff in there as you can see.


Here both cats have made an appearance. This is where Kitty hangs out 24/7 basically. The bins beside the media console are empty and are going into storage at some point in time... lol


The living room is set up into sections. On the left with the bookshelf will be my office area. The middle is the TV area obviously and then Brandyn's computer on this side.


And the empty wall that will soon be my office area. Those bins in the corner are full bins (childhood stuff) and are going into storage as well. The carpet is still rolled up because i just haven't put it down yet.
 

As you can see, not much at all has been done with the living room. It took forever to unpack mainly because we didn't have bookshelf so I was just unpacking things from one box to put in another. I got fed up and went and got the bookshelf I wanted. 

What we still need to do in this area:
  • Bring those items to storage 
  • Get some throw pillows for the couch
  • Add some art above the couch
  • Finish my office space
  • Look for a rug that fits the room better (also another part of the reason I haven't put it down)
  • Get a new couch cover (the cover ripped in the move but a new cover doesn't cost that much)
  • Get a coffee table

That is basically in order of importance as well! lol
 
And that, my friends, is our apartment as it stands right now! You will see it again very soon though because on Tuesday we will be decorating for the holidays and the Christmas music IS coming on despite Brandyn's protests :)

Thursday, November 07, 2013

1 Month In: The Kitchen and Dining

Moving along to the kitchen and dining room portion of the apartment...

Before:

Now:


The kitchen is slowly becoming organized. It is one of the rooms that takes the most work to organize so it definitely doesn't happen over night. I've implemented a few things here and there. Using your vertical space is one of the best ways to maximize on space in your cupboards so I got this shelf for my plates and as you can see a few of my soup bowls and mugs fit right in there as well. This one is from Target.


This is the little coffee corner. I grabbed one of these hangers from Home Outfitters. It just hooks on to the bottom of the cabinet. Mugs are easy to reach and the sugar is right there as well. 


Pots are one of the most annoying things. Especially the lids. I have this little shelf built into my cupboard so that makes it easier. I also got this lid organizer from Target. It is a life saver. As soon as I saw it, I grabbed it, no questions asked. Eventually I would like to install one of those pull out things (see here) for the pots and pans. They are kind of expensive so it may be a while before that makes its way into here.


For the kitchen, I still need to:
  • Finish organizing everything
  • Get some art
  • Get a new microwave**

**The story behind the microwave: It is huge and it is heavy. There is no working plug on that side of the counter so not only does it take up a ton of space over there, it also needs to be moved every time we want to use it. Not convenient at all. We can't get around the moving it part but what we can do is get a smaller one. Can't wait for that day!

Now for the dining room!

Before:


And now:

The garbage is in the dining room because that is the only place we can put it lol. I also have that little island there with the mixer on top. That is my "baking station." The baskets underneath hold all my baking stuff. Pans, measuring cups and all that. I got them from Walmart (and the island thing from Ikea). It is actually a perfect spot because if I need more counter space or am baking, I can just wheel the island forward and place it in front of the kitchen doorway!


Say hello to the maroon blinds that came with the apartment.... moving on. The basket in the back holds blankets and wedding stuff. We got that at Target for a steal because the price was labelled wrong. I personally don't think it was worth $70 anyway....


And here is a closer look at my baskets. You can see I have 2 small ones at the top. I originally wanted wire baskets but I couldn't find any that were the size I wanted so this had to do.

Here is what I have left to do in the dining room: 
  • Get the art I talked about in a previous post
  • Do some DIY magic to the island (it probably won't be done until the spring because it involves warm weather to let paint dry)
  • Replace the temporary fold up chairs with real (and by real I mean nice) dining room chairs